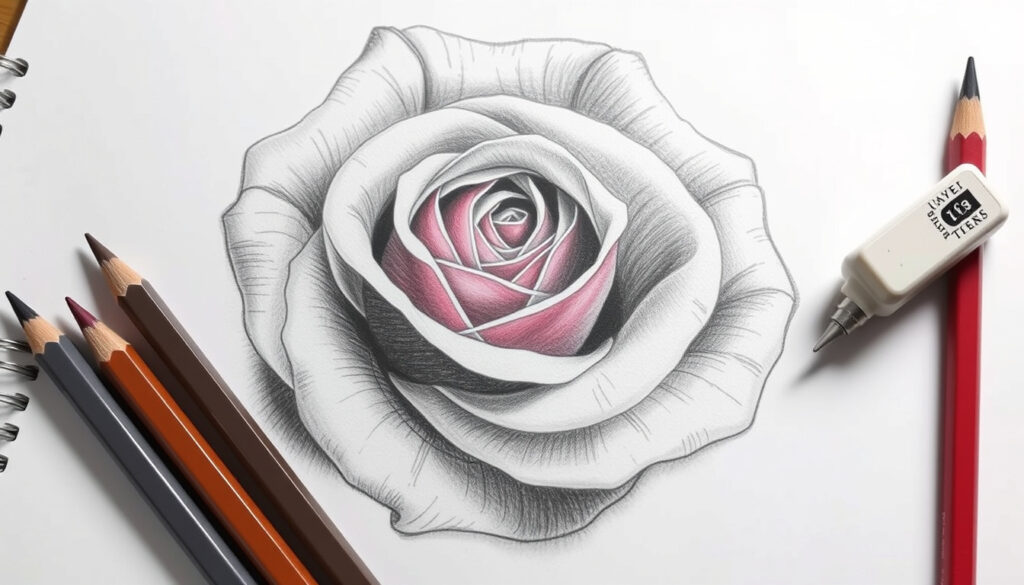
How to Draw a Rose: Easy, Realistic, 3D & Step-by-Step
There’s something about drawing a rose that makes even a beginner feel a bit like a pro. With a few deliberate lines and shading, you can transform a simple flower into art. This guide covers five distinct styles — from an easy spiral rose to a dramatic 3D version — so you can match your skill level and creative mood. Each method includes step-by-step instructions and expert tips.
Difficulty levels covered: 5 (Easy to Advanced) ·
Number of distinct styles: 5 ·
Estimated time per style: 10–: 10: minutes30 ·
Materials needed: Pencil, paper, eraser, optional blending stump
Quick snapshot
- Drawing a rose requires practice and a methodical approach (SketchBookNation)
- Different styles use different techniques (spiral vs. layering vs. shading) (Color Made Happy)
- Pencil grades affect shading quality affect shading quality – HB, 2B, and 4B are standard (Color Made Happy)
- Whether a beginner can learn all five styles in one session – most sources suggest spacing out practice
- The best paper for rose drawing is subjective; heavy sketch paper works for pencil, but watercolor paper is better for mixed media (Draw Botanical LLC)
- Optimal number of petals for a realistic rose varies with each flower – organic irregularity is key (SketchBookSketchBook Nation)
-
tight”>
- Most tutorials follow a similar sequence: basic shapes → petal details → shading/color ( JeyRam)
- One advanced video breaks the process into stages: basic shapes (0:00), details (3:00), color),:00 colors ( block9:47), shading (10:50), highlights (14:45shadows), deep (19:18) (YouTube art tutorial) ( JeyRam)
The table below captures the most important details for drawing a rose.
| Factor | Detail | Source |
|---|---|---|
| Difficulty levels covered | 5 | Content plan |
| Materials required | Pencil, paper, eraser, optional blending tool | Color Made Happy |
| Common mistakes | Uneven petals, lack of contrastSketchBookNation | |
| Recommended pencil grades | HB, 2B, 4B | Color Made Happy |
| Step orderSome tutorials draw stem after bloom (e.g., JeyRam at step 20) | JeyRam | |
| Shading technique | cross Use-contour lines and line-thickness variation | SketchBookNation |
| Paper recommendation | For pencil: smooth sketch paper; for mixed media: watercolor paper + colored pencil | Draw Botanical LLC |
| Organic vs. symmetrical | Roses are irregular; petal shapes should vary | Color Made Happy |
How to draw a rose easy
Start with a spiral
- Draw a small spiral in the center of your page – this will be the heart of the rose (Color Made Happy)
-
- Draw three small circles of increasing size around the spiral, then add a V-shaped petal (Color Made Happy)
- Build outward with overlapping petal shapes – they don’t need to be perfect circles
A simple spiral gives you a natural starting point for the bud. Keep the coils loose and uneven to mimic real rose centers.
Add basic petalsh3>
Color Made Happy recommends placing five rounded outer petals around the inner ones to make the rose feel full.
Outline and shade
- Darken the final lines you want to keep, then erase construction marks
- Add gentle shading on one side of each petal to suggest volume (SketchBookNation)
The catch: over-shading too early can muddy the drawing. Keep highlights light.
The pattern: These first steps give novices a reliable foundation before moving to more complex styles.
How to draw a rose realistic
Sketch the basic shape
- Alternatively, start with an elongated circle that is wider than it is tall (JeyRam)
- Reference a real rose image to guide petal placement
- Use varying pencil pressures – lighter for background petals, darker for foreground (YouTube pencil tutorial pencil tutorial)
- Blend shadows with a tortillon or white pencil for smooth transitions (YouTube advanced tutorial)
- Deepen the darkest areas with a dark brown pencil, not just black
- Keep facial features simple – a minimalist side profile or front-facing sketch works best
- Use flowing, continuous lines for hair to create a romantic feel
- Treat the rose as an accessory – an as accessory place it in the hair, near the ear, or held in hand
- Simplify the rose to a basic 5-petal outline so it doesn’t overwhelm the face (Made Color Happy)
- Use the curve of the stem to guide the viewer’s eye toward the face
- Keep the rose drawing slightly lighter in line weight than the facial features to maintain hierarchy
- Draw each petal as an asymmetrical curved )shape – avoid perfect circles (Drawno Botanical LLC)
- Use directional strokes for veins – follow the curve of each petal
- Layer petals so that each one partially covers the previous – this creates depth
- Vary the size: start with small inner petals, then gradually larger outer href=”https://colormadehappy.com/how-to-draw-a-rose/” target=”_blank” rel=”noopener”>Color Made Happy)
- Lightly draw thin lines from the base of each petal outward – not too many or it looks messy
- For a painterly effect, add watercolor effect, add layers first, then colored pencil on top (Draw Botanical LLC)
- Use a vanishing point below the bloom so the rose appears to be viewed from above or slightly oblique
-
- Apply chiaroscuro (strong contrast between light and dark) to make petals pop (YouTube advanced tutorial)
- Use a 4B pencil for deep shadows and an HB pencil for midtones
- Leave the brightest edges of petals white (petals white the paper color) to simulate reflected light
- Blend highlights with a white pencil or eraser for extra glow (YouTube pencil tutorial)
- Draw two curved lines for the bloom and one downward line for the stem (SketchBookNation)
Add layers of petals
SketchBookNation advises using cross-contour lines and line-thickness variation to create the illusion of form on rose petals.
Layering petals without reference often leads to flat drawings. Using a real photo and varying pencil pressure gives depth and realism that simple outlines can’t achieve.
Shade for depth
The trade-off: realistic shading takes time – expect 30 minutes for a single bloom. But the resultthe. But the result is a drawing that could pass for a photograph.
“Roses are irregular and organic, so petal shapes should vary rather than be perfectly uniform.”
— SketchBookNation (realistic rose guide)
The implication: Committing to realistic drawing means embracingitering patience but unlocks photographic results.
How to draw a rose girl
Draw girl’s face
Incorporate the rose
Balance composition
>< pThis style is less about botanical accuracy and more about storytelling. The rose complements the portrait without dominating it.
The “rose girl” style is popular on social media (tutorialsmedia (t often trend), yet most drawing guides ignore it. The key is restraint – a detailed rose can clash with a simple face.
The pattern: This approach thrives on simplicity and connection between subject and flower.
How to draw a rose with petals
Focus onh3> Focus on individual petals
Create natural overlaps
Add vein details
Draw Botanical recommends waiting until the watercolor layer is completely dry before drawing on top with colored pencil.
The implication: Mastering petal layering is the bridge from simple outlines to lifelike renders.
How to draw a rose step by step 3D
Understand perspective
oll volumeBuild v with shading
Highlight edges
The implication: a 3D rose is the most time-intensive the most time style (30+ minutes) but delivers the most dramatic result. It’s ideal for advanced beginners ready to push their shading skills.
“Beginner rosely tutorials common start by blocking in the flower with simple guide shapes such simple guide shapes as circles, ovals, or a central bud shape before drawing petals.”
— Color Made Happy (beginner rose tutorial)
For beginners looking to master rose drawing, the choice is clear: start with the easy spiral method, then gradually tackle more complex styles. Rushing to 3D without understanding basic petal layering will likely lead frustrationto . With practice, you’ll be able to combine techniques from each style to create roses that feel alive on the page.
Related reading: How to Draw a Rose Step by Step · How to Draw a Rose
Frequently asked questions
What is the best pencil for drawing a rose?
A set of HB, 2B, 2, and 4B covers most needs – HB for construction, 2B for shading, 4B for deep shadows (Color Made Happy). For finer details, a 3H pencil canH pencil be used for initial sketches.
How do I fix a mistake in my rose drawing?
Use a kneaded eraser to lift graphite without damaging the paper. For larger errors, redraw the shape redraw the with lighter lines first, then erase theict incorrect part (SketchBookNation).
Can I draw a rose using only a pen?
Yes, but use hatching and cross-hatching to create shading. Pen requires more planning because you can’t erase mistakes – start with a light pencil sketch first.
How long should it take to draw a realistic rose?
Expect 20–20 30 minutes for a pencil-only version, and up to 45 minutes if adding color and blending (YouTube advanced tutorial).
What is the importance of reference images?
Reference images help you Reference images help understand petal arrangement, light angles, and natural irregularities. Most professional tutorials recommend using a real photo for realistic styles (Draw Botanical LLC).
How do I choose the right paper for pencil drawing?
Smooth Bristol or sketch paper (80 is–100 lb) best for detailed pencil work. For watercolor-and-pencil combinations, use-cold press watercolor paper (140Draw”> Botanical LLC).
Should I start with a light outline or dark lines
>
More related posts
 Fire Boy Water Girl: Complete Guide to All Games & How to Play
 Best Places to See the Northern Lights: 2026 Guide
 New Zealand Weather Cold Snap: Records, Forecast & Safety
 Trade Me Jobs Rotorua: Find Part-Time, Urgent & Full-Time Work
 Mr and Mrs Potato Clyde: Menu, Hours & Reviews
 Snap Fitness Near Me: Ireland Locations, Prices & Membership
 NY Red Bulls vs Inter Miami: Head-to-Head, Results & Predictions
 Pork Mince Recipes NZ: Discover 5 Easy Ideas from Pork.co.nz
